Summary
– How do you install a slate roof?
– How do you clean a slate roof?
This post is a continuation of the post What is a Slate Roof (Part 1). Previously we have seen:
◦ Characteristics of the Slate Roof
◦ What type of slate to choose for your roof?
The choice of a roof covering is made according to the aesthetics sought and the type of roof, but also according to regional characteristics and the constraints of the local town planning scheme. The roof covering is the top layer of the roof which is in direct contact with the external elements. You will have to take into account the climate of your region when making your choice: rainfall, sunshine, wind conditions, snow cover. Good to know: the exterior appearance of the house is governed by local regulations. Check the standards in this area with the town hall before you start your investment.
How do you install a slate roof?
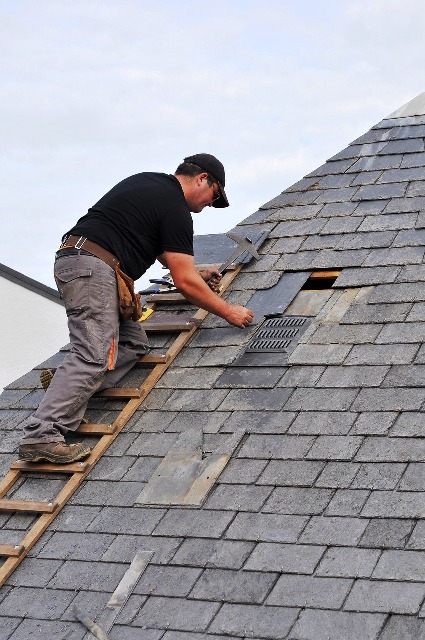
The slates laid on a roof must be laid in three layers, which is called “triple overlapping” or “tiering”.
Principle of overlapping
Each slate placed on a roof is divided into 3 parts:
– The overlap: designates the surface covered by two layers of slate.
– The false wall: designates the surface covered by one layer of slate.
– The overhang: designates the visible surface; it corresponds to the distance between the battens.
In fact, only the upper and lower surfaces receive rain: directly for the former, by capillary action for the latter.
The minimum value of the overlap is a function of:
– of the slope;
– of the region;
– the site, the orientation;
– the length of water flow;
– the method of attachment.
The determination of the overlap should be studied in particular for the case of a slope exposed to winds (it is recommended to increase the overlap by 10%).
The choice of slate format depends on the covering adopted. The height of the slates must also be at least 3 times the value of the overlap.
Techniques for laying slate on a roof
There are 2 ways to put the slate down:
– by nailing;
– with hooks.
The method remains practically the same in both cases:
– Start laying from the bottom. For the first row, superimpose two slates by raising the bottom one with a chamfer:
◦ the chanlatte is a wooden slat split into a bevel that will maintain the slope;
◦ the first row should protrude about 4-5 cm, so that the wood does not get wet.
– Make the hip:
◦ the hip is the intersection between two sides of the roof;
◦ it can be made of slate, by making the last row of slate protrude from the windward side of the roof;
◦ it can be made in terracotta or zinc tiles.
– Any cuts should not be made with a grinder: the edges would be too sharp. Instead, use a roofer’s anvil or a slate tongs, which allows you to make sharp edges.
– Concerning the valleys, it is advisable to make a zinc valley to reinforce the watertightness of this area.
– For hatches, roof windows or other singular points on the roof (chimney, ventilation outlet), there are installation techniques to ensure that water does not penetrate in these areas.
Please note: slate has a front and a back. The right side is the bevelled side, which will face upwards, in order to evacuate rainwater.
How do you clean a slate roof?
Slate roofs can become covered with algae and lichens over time. This proliferation retains moisture and alters the slate.
It is then advisable to treat the roof with an anti-moss: a simple sprayer will be used to spread it all over the roof.
A few precautions, however, must be taken:
– It must not rain within 48 hours after spraying for best effectiveness.
– To preserve your roof from any premature degradation, avoid scratching the moss installed on your roof.
– Before using anti-foam products, protect your hands with rubber gloves.
– Wear suitable clothing and special glasses to protect your eyes from the harmful effects of chemicals.
– Do not apply the product when the weather is too sunny to avoid accelerated evaporation.
– Protect glass (roof windows) or flowers in the vicinity of the spray.
– Spray these products from top to bottom to prevent infiltration under the slates.
– Always take the time to read the manufacturer’s instructions carefully. Some anti-foaming products require rinsing after application, while others do not.
Overall, this blog should appeal to individuals seeking information about home roofing materials. So, you’ll be more informed about what they can give you for your home roofing project the next time you talk to your roofing contractor.
If you would like to read something, in particular, do not forget to leave your comments in the section below.